A few months ago, I started developing my first ever PyPI-published python package, called pylambdarest.
This post is not about pylambdarest itself (I’ll let you have a look at the documentation if you are interested). Rather, I will tell you about the journey I had, setting-up my development tooling, from dependency management to quality assurance, documentation, and CI/CD.
We will cover the following topics:
- Dependency Management (and much more) with Poetry
- Quality Assurance: black, mypy, pylint, pre-commit, pytest, coverage.py
- CI/CD with Github Actions
- Documentation with Sphinx and Read the Docs
What we will build: Time Series Generator
Let’s say you want to develop a package that allows you to quickly generate time series of different shapes. We will name it tsgen for Time Series Generator. Here is tsgen in action:

The code for this toy package is quite simple. It implements a new TimeSerie class and some generator functions that rely heavily on pandas and numpy.
Here is our initial project structure:
tsgen
├── tsgen
│   ├── __init__.py
│   ├── time_serie.py
│   └── generators.py
└── README.md
The class TimeSerie is defined in time_serie.py and implements methods such as addition, subtraction, and basic plotting:
| import pandas as pd | |
| import numpy as np | |
| class TimeSerie: | |
| def __init__(self, index, y): | |
| if not isinstance(index, pd.DatetimeIndex): | |
| raise TypeError("index should be a pandas.DatetimeIndex") | |
| self.index = index | |
| self.y = np.array(y) | |
| if len(index) != len(y): | |
| raise ValueError("index and y's shapes do not match") | |
| def to_frame(self): | |
| return pd.DataFrame({"y": self.y}, index=self.index) | |
| def plot(self): | |
| self.to_frame().y.plot() | |
| def __len__(self): | |
| return len(self.index) | |
| def __str__(self): | |
| return str(self.to_frame()) | |
| def __repr__(self): | |
| return self.__str__() | |
| def __eq__(self, other): | |
| if not isinstance(other, TimeSerie): | |
| return False | |
| return (self.index == other.index).all() and (self.y == other.y).all() | |
| def __add__(self, other): | |
| if ( | |
| (not isinstance(other, TimeSerie)) | |
| and (not isinstance(other, int)) | |
| and (not isinstance(other, float)) | |
| ): | |
| raise TypeError("Wrong values") | |
| if ( | |
| isinstance(other, TimeSerie) | |
| and not (self.index == other.index).all() | |
| ): | |
| raise ValueError("Indexes do not match") | |
| if isinstance(other, TimeSerie): | |
| return TimeSerie(index=self.index, y=(self.y + other.y)) | |
| return TimeSerie(index=self.index, y=(self.y + other)) | |
| def __sub__(self, other): | |
| if isinstance(other, TimeSerie): | |
| negative_other = TimeSerie(index=self.index, y=(-1 * other.y)) | |
| else: | |
| negative_other = -1 * other | |
| return self + negative_other |
In the file generators.py, we define functions that generate TimeSerie objects, such as sine or affine from the previous notebook:
| import math | |
| import numpy as np | |
| import pandas as pd | |
| from tsgen.time_serie import TimeSerie | |
| def affine(start, end, freq, start_y, end_y): | |
| index = pd.date_range(start=start, end=end, freq=freq) | |
| return TimeSerie(index=index, y=np.linspace(start_y, end_y, len(index))) | |
| def constant(start, end, freq, value): | |
| return affine(start, end, freq, value, value) | |
| def cosine(start, end, freq, amp=1, n_periods=1): | |
| index = pd.date_range(start=start, end=end, freq=freq) | |
| return TimeSerie( | |
| index=index, | |
| y=amp | |
| * np.cos(np.linspace(0, 2 * math.pi * n_periods, num=len(index))), | |
| ) | |
| def sine(start, end, freq, n_periods=1): | |
| index = pd.date_range(start=start, end=end, freq=freq) | |
| return TimeSerie( | |
| index=index, | |
| y=np.sin(np.linspace(0, 2 * math.pi * n_periods, num=len(index))), | |
| ) |
And __init__.py:
| from tsgen.time_serie import TimeSerie | |
| import tsgen.generators as generators | |
| __all__ = ["TimeSerie", "generators"] |
Now that we have in mind how the code works and what it should do, we will discuss how we can turn these three files into a quality PyPi-published python package.
Dependency management and package publishing with Poetry
As stated earlier, tsgen will depend on pandas and numpy for the core features. It will also rely on several other development dependencies for documentation, linting, testing, etc.
There are plenty of ways to install those dependencies in a dedicated virtual environment. You could use the good old pip and virtualenv with some requirements.txt files.
But there are modern tools that manage all of that for you and much more. And one of them is Poetry.
When you are at the root of your project, you can initialize Poetry with just one command: poetry init
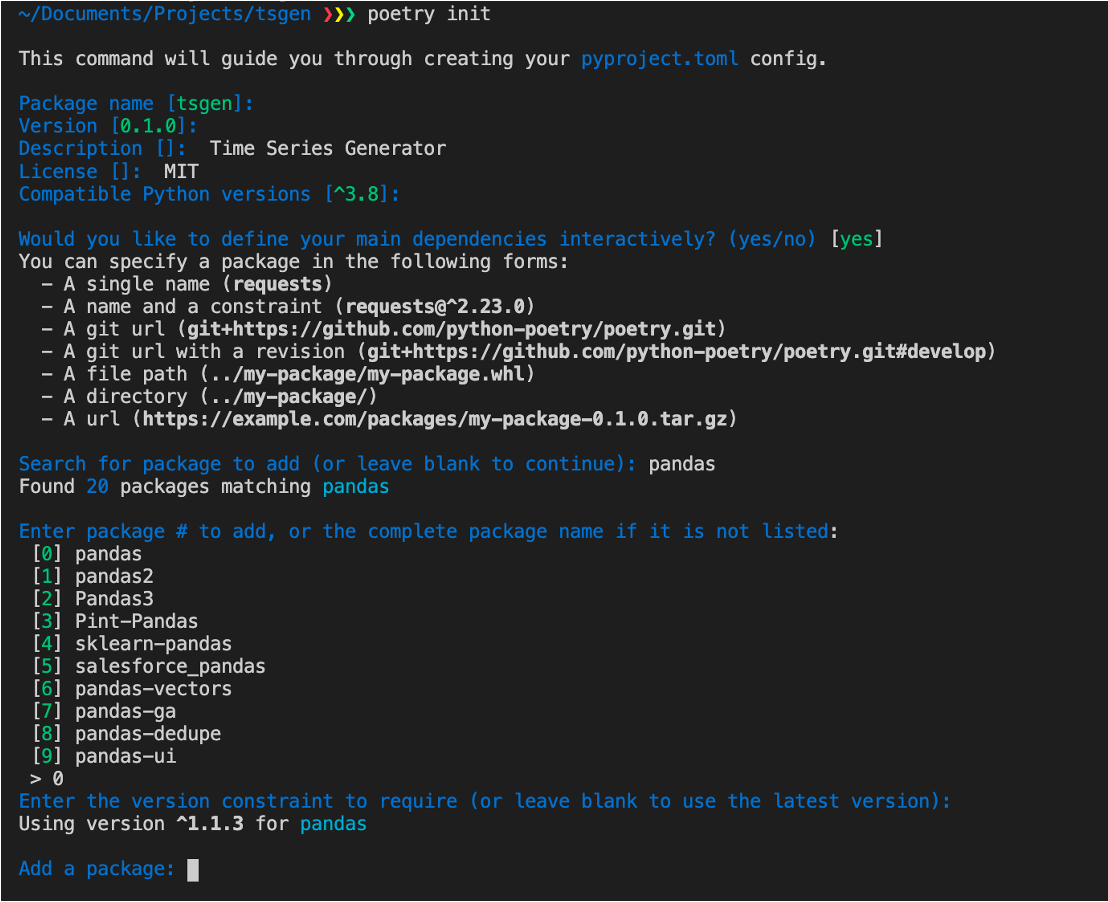
Poetry will guide you through the initialization process, asking you about the project’s name, its dependencies, and development dependencies. Finally, it will generate a pyproject.toml file containing all the important information about your project:
| [tool.poetry] | |
| name = "tsgen" | |
| version = "0.1.0" | |
| description = "Time Series Generator" | |
| authors = ["Marwan Debbiche <marwan.debbiche@example.com>"] | |
| license = "MIT" | |
| [tool.poetry.dependencies] | |
| python = "^3.8" | |
| pandas = "^1.1.3" | |
| numpy = "^1.19.2" | |
| [build-system] | |
| requires = ["poetry>=0.12"] | |
| build-backend = "poetry.masonry.api" |
To install your dependencies in the project’s virtual environment, you can just run poetry install.
If you want to add a new dependency, it’s as simple as :
poetry add newdependency
poetry add -D pytest # -D for development dependency
To run a command within your virtual environment you can do:
poetry run pytestFor the version management of Python itself, Poetry plays nicely with pyenv, which lets you switch easily between different versions:
pyenv install 3.8.5
pyenv local 3.8.5  # Activate Python 3.8 for the current project
poetry install
But Poetry is not just a dependency management tool. As stated in the documentation:
Poetry is a tool for dependency management and packaging in Python. It allows you to declare the libraries your project depends on and it will manage (install/update) them for you.
It can package your library and even publish it to PyPI:
poetry publish -u PYPI_USERNAME -p PYPI_PASSWORD --build
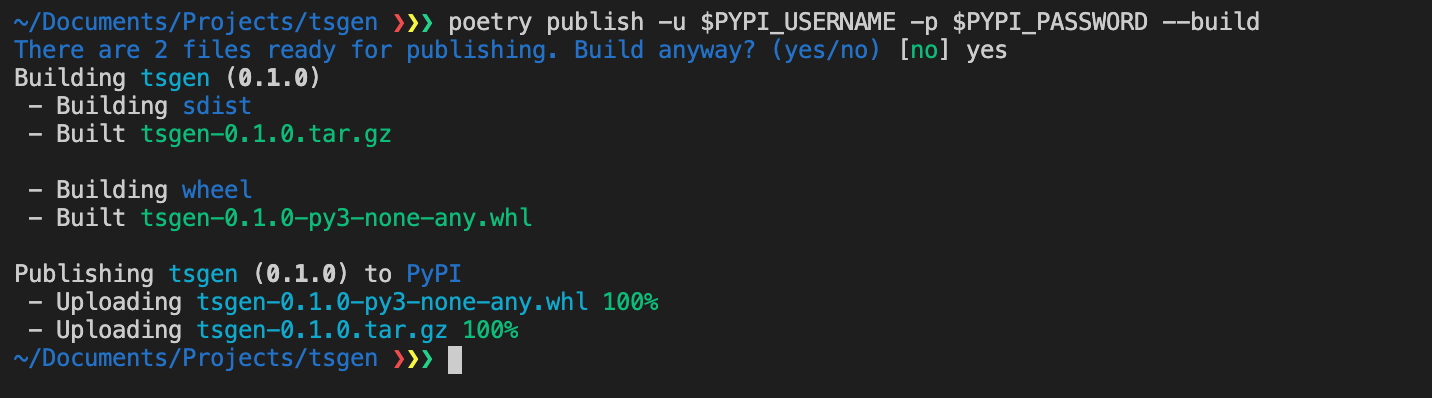
And just like that, tsgen is hosted on PyPI.
Quality Assurance
Thanks to Poetry, it’s quite simple to build and publish your package to PyPI. But hosting it on PyPI doesn’t make it a good package.
Sure, we tested it for a bit in a notebook, and it seems to do what it should. But how can we be sure that there are no bugs? Or at least how can we minimize the risk?
For example, here is a bug I noticed after a while:
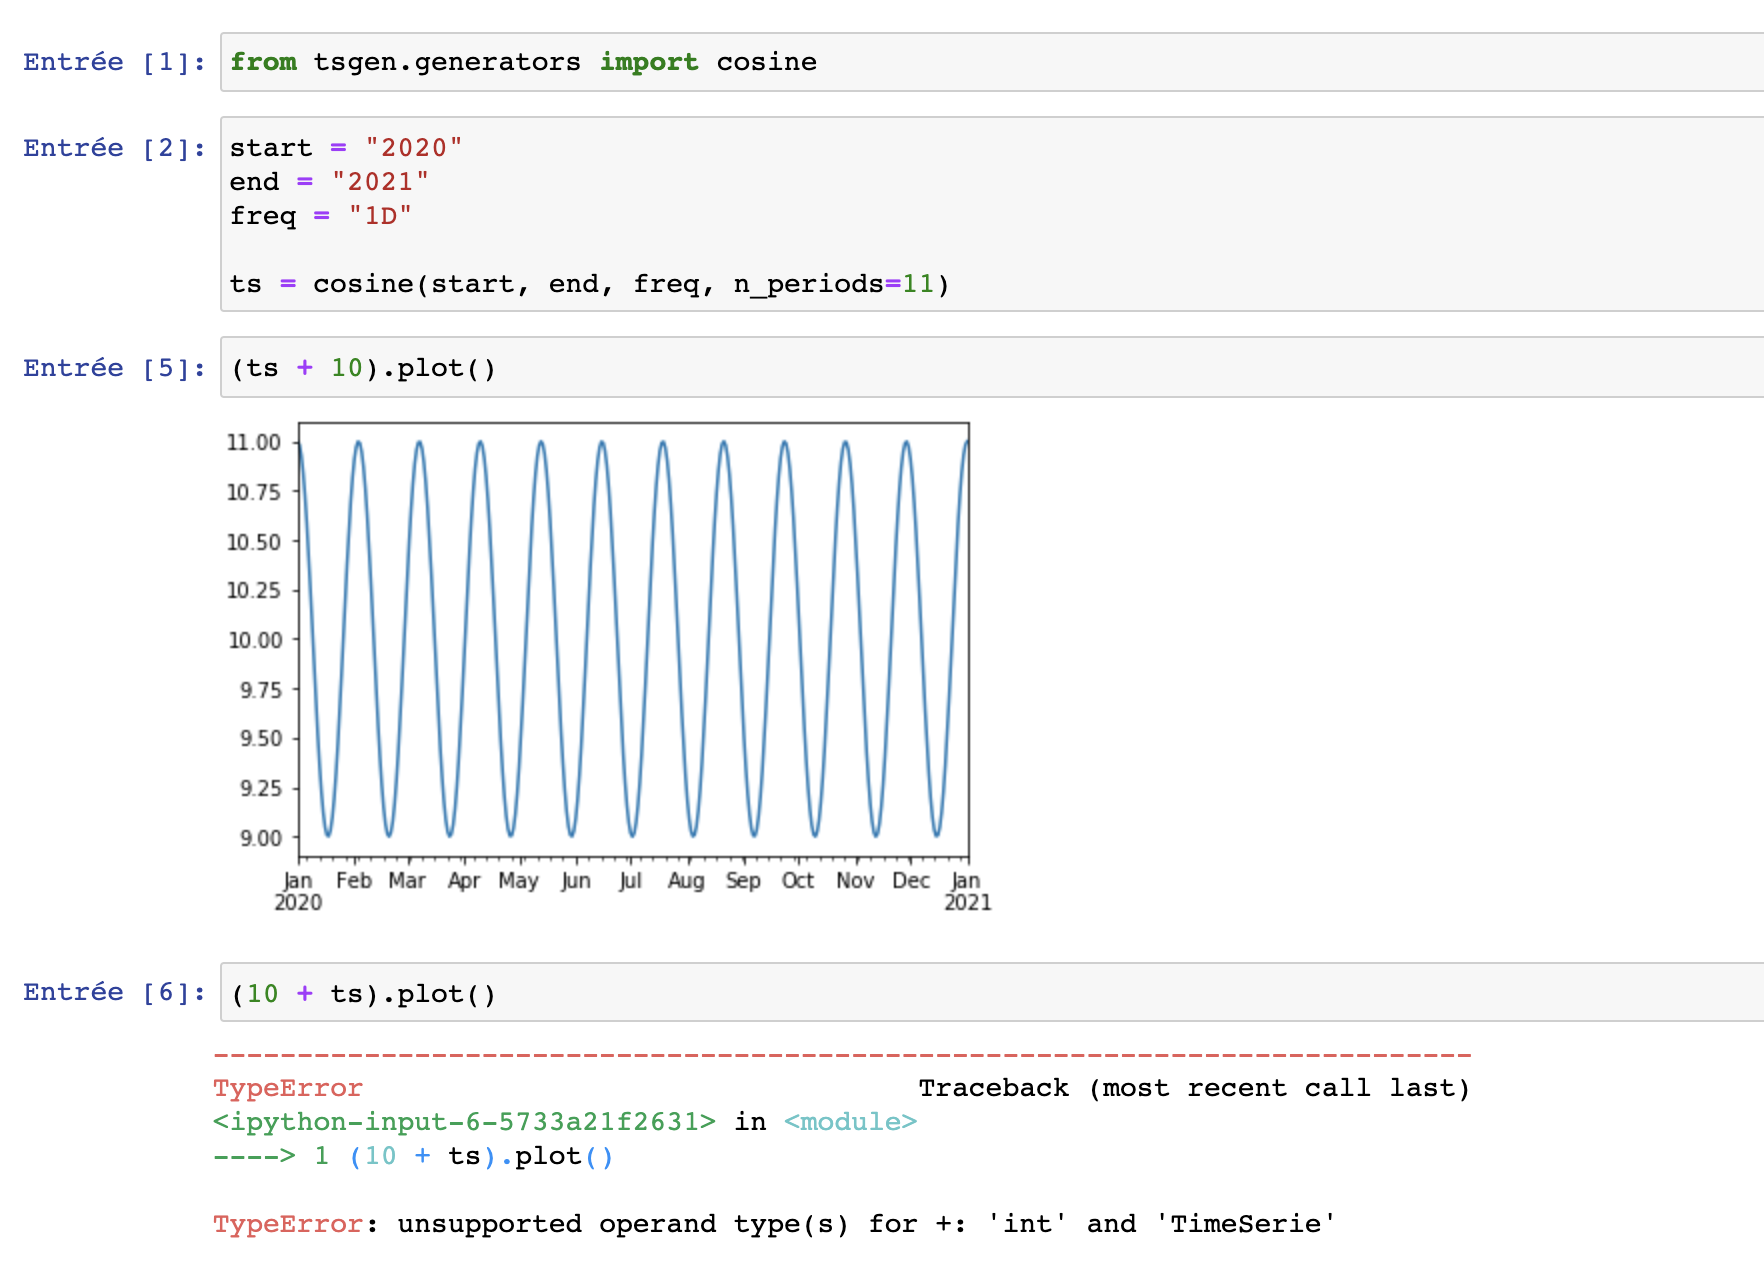
I just forgot to add a __radd__ method in the TimeSerie class. This is a trivial bug that could have been detected a lot quicker. This is where Quality Assurance comes into play.
Testing with pytest
Quality Assurance in software engineering implies many things. But in my opinion, testing is the cornerstone of QA.
Several python packages exist for testing such as pytest, unittest, or nose. Find the one you like best. Personally, I like pytest. Let’s see how we can use it for tsgen.
First, we need to add a /test directory at the root of our project, containing test files for each of our package source file:
tsgen
├── tsgen
│   ├── __init__.py
│   ├── time_serie.py
│   └── generators.py
│
├── tests
│   ├── test_time_serie.py
│   └── test_generators.py
│
├── pyproject.toml
└── README.md
Let’s write a few test cases in test_time_serie.py:
| import pandas as pd | |
| import numpy as np | |
| import pytest | |
| from tsgen import TimeSerie | |
| @pytest.fixture | |
| def ts_monthly_constant(): | |
| start = "2020" | |
| end = "2021" | |
| freq = "1M" | |
| index = pd.date_range(start=start, end=end, freq=freq) | |
| return TimeSerie(index=index, y=np.linspace(1, 1, len(index))) | |
| @pytest.fixture | |
| def ts_monthly_1(): | |
| start = "2020" | |
| end = "2021" | |
| freq = "1M" | |
| index = pd.date_range(start=start, end=end, freq=freq) | |
| return TimeSerie( | |
| index=index, | |
| y=np.random.randn(len(index)) | |
| ) | |
| @pytest.fixture | |
| def ts_monthly_2(): | |
| start = "2020" | |
| end = "2021" | |
| freq = "1M" | |
| index = pd.date_range(start=start, end=end, freq=freq) | |
| return TimeSerie( | |
| index=index, | |
| y=np.random.randn(len(index)) | |
| ) | |
| @pytest.fixture | |
| def ts_daily(): | |
| start = "2020" | |
| end = "2021" | |
| freq = "1D" | |
| index = pd.date_range(start=start, end=end, freq=freq) | |
| return TimeSerie( | |
| index=index, | |
| y=np.random.randn(len(index)) | |
| ) | |
| def test_len(ts_monthly_1, ts_daily): | |
| assert len(ts_monthly_1) == 12 | |
| # 2020 is a leap year and 2021-01-01 is included | |
| assert len(ts_daily) == 367 | |
| def test_addition(ts_monthly_1, ts_monthly_2, ts_monthly_constant): | |
| assert (ts_monthly_1 + ts_monthly_2) == (ts_monthly_2 + ts_monthly_1) | |
| assert (ts_monthly_1 + ts_monthly_constant) == (ts_monthly_1 + 1) | |
| # this line fails if we don't implement a __radd__ method: | |
| assert (1 + ts_monthly_1) == (ts_monthly_1 + 1) |
We define fixtures that return TimeSerie objects, and then use them in two test functions.
As you can see, the last assertion will fail if __radd__ is not implemented:

After implementing __radd__ :

All clear!
Coverage with Coverage.py
Now that our first tests passed, should we stop? How much is enough?
We can figure it out using Coverage.py to analyze the test coverage, which is the percentage of your source code’s statements that are being tested.
poetry add -D coverage
poetry run coverage run -m --source=tsgen pytest tests
poetry run coverage report
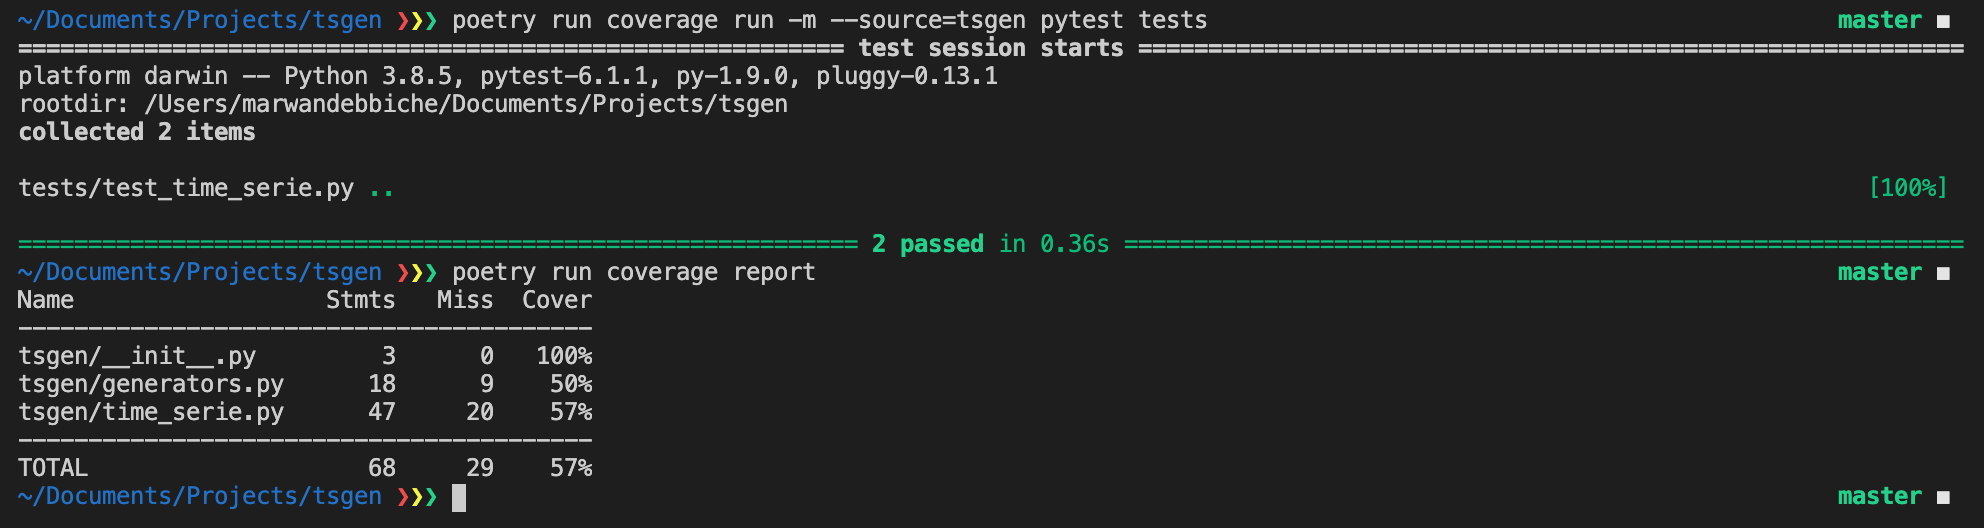
The goal, of course, is to achieve 100% coverage. But you should also write a test for each feature of your package.
Linting
What is it? From Wikipedia:
lint, or a linter, is a static code analysis tool used to flag programming errors, bugs, stylistic errors, and suspicious constructs
There are plenty of python linters: pylint, pycodestyle, flake8, wemake-python-styleguide…
Even if they often overlap, they usually have small differences in the types of errors they flag, so you might consider using several linters for the same project.
Here is an example of pylint output:
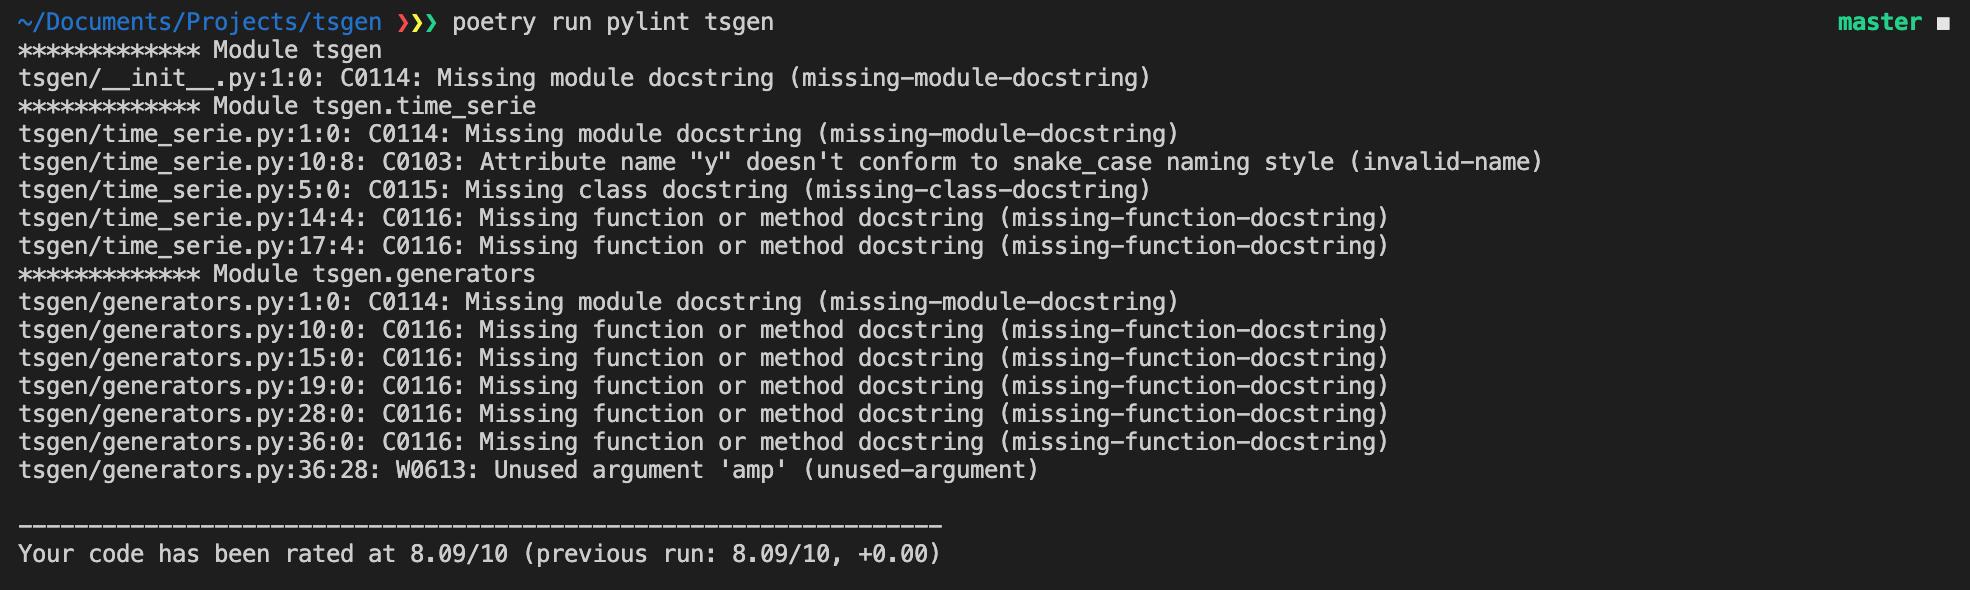
As you can see, there are a lot of missing docstrings, and maybe the y attribute in TimeSerie isn’t well named (too short). Maybe y_values would be better?
Overall pylint gave tsgen a grade of 8.09/10. Not too bad.
If you have a lot of styling errors (not conforming to PEP8), you can use a formatter like black to automatically format your code.
Type checking with mypy
Python is dynamically typed, meaning that the variables’ types are inferred at runtime, and not defined beforehand. This makes python very easy to learn, but also has some pitfalls. Mainly, it is error-prone.
Luckily, type hints were introduced in version 3.5 of python and allow you to declare the types of your variables, function arguments, and return values:
def say_hello_n_times(name: str, n: int) -> None:
    hello_string: str = "Hello {} !".format(name)
    for _ in range(n):
        print(hello_string)
Of course, type hints are just hints and don’t change the fact that Python is dynamically typed. So the following code is completely valid and will not throw any error.
a: str = dict(name="John Doe")However, a type checker like mypy can detect these kinds of inconsistencies, allowing you to find sneaky bugs before they occur.
To check types with mypy you can run:
poetry add -D mypy
poetry run mypy tsgen
But you will probably get the following output:

This is because pandas and numpy have no type hints, so mypy can’t analyze them.
You can either install data-science-types, which provides type information for matplotlib, numpy, and pandas or just add # type: ignore at the end of each associated import statements. I chose the latter because I found that the data-science-types package is not mature yet, and a lot of type definitions are missing:
| import math | |
| import numpy as np # type: ignore | |
| import pandas as pd # type: ignore | |
| from tsgen.time_serie import TimeSerie | |
| def affine(start, end, freq, start_y, end_y) -> TimeSerie: | |
| """ | |
| Generate a linear TimeSerie. | |
| """ | |
| index = pd.date_range(start=start, end=end, freq=freq) | |
| return TimeSerie( | |
| index=index, y_values=np.linspace(start_y, end_y, len(index)) | |
| ) | |
| def constant(start, end, freq, value) -> TimeSerie: | |
| """ | |
| Generate a constant TimeSerie. | |
| """ | |
| return affine(start, end, freq, value, value) | |
| def cosine(start, end, freq, amp=1, n_periods=1) -> TimeSerie: | |
| """ | |
| Generate a cosine TimeSerie. | |
| """ | |
| index = pd.date_range(start=start, end=end, freq=freq) | |
| return TimeSerie( | |
| index=index, | |
| y_values=amp | |
| * np.cos(np.linspace(0, 2 * math.pi * n_periods, num=len(index))), | |
| ) | |
| def sine(start, end, freq, n_periods=1) -> TimeSerie: | |
| """ | |
| Generate a sine TimeSerie. | |
| """ | |
| index = pd.date_range(start=start, end=end, freq=freq) | |
| return TimeSerie( | |
| index=index, | |
| y_values=np.sin( | |
| np.linspace(0, 2 * math.pi * n_periods, num=len(index)) | |
| ), | |
| ) | |
| def randn(start, end, freq, mean=0, std=1) -> TimeSerie: | |
| """ | |
| Generate a random normally distributed TimeSerie. | |
| """ | |
| index = pd.date_range(start=start, end=end, freq=freq) | |
| return TimeSerie( | |
| index=index, y_values=(std * np.random.randn(len(index)) + mean) | |
| ) |
And mypy checks now pass successfully:

Pre-commit
Now that we have installed and run our quality assurance tools, how can we make sure that they are actually used and that we are not committing or publishing any poor quality code or package?
The first way to do that is to use pre-commit. pre-commit lets you define and install git hooks, which are scripts that are run just before a commit.
Here is a pre-commit config file to run standard checks such as end-of-file or trailing-whitespace, pylint, and mypy:
| repos: | |
| - repo: https://github.com/pre-commit/pre-commit-hooks | |
| rev: v3.2.0 | |
| hooks: | |
| - id: check-yaml | |
| - id: debug-statements | |
| - id: end-of-file-fixer | |
| - id: trailing-whitespace | |
| - repo: local | |
| hooks: | |
| - id: pylint | |
| name: pylint | |
| entry: pylint | |
| exclude: ^(tests/) | |
| language: system | |
| types: [python] | |
| - repo: https://github.com/pre-commit/mirrors-mypy | |
| rev: v0.790 | |
| hooks: | |
| - id: mypy | |
| exclude: ^(tests/) |
Let’s install the hooks:
poetry add -D pre-commit
poetry run pre-commit install
Then if we have an invalid file, pre-commit will prevent us from committing:
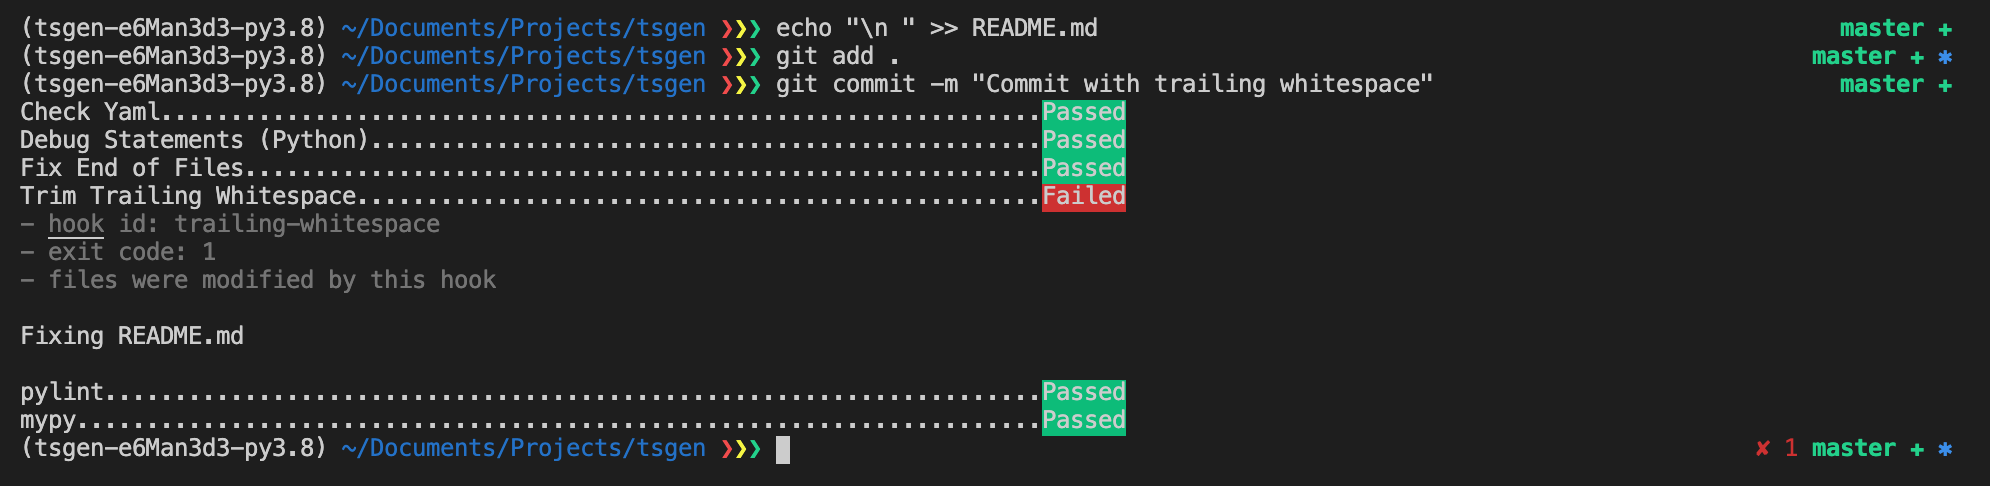
In this case, it will even fix the invalid file by removing the trailing whitespace. You can then stage those changes and commit again:

You can still commit files with errors using the--no-verify argument in git commit . For example, if you need to share some work in progress on a development branch with coworkers.
CI/CD with Github Actions
Now that we have installed all our QA tools locally, how can we make sure that everyone uses them? What if your teammate doesn’t want to install pre-commit hooks, and push shoddy code in your VCS? How can you make sure to detect it before it is published?
To do so, you need to have an efficient CI/CD (Continuous Integration / Continuous Delivery) pipeline that will automatically run linting and tests for you every time a new commit is pushed. It should also publish your package automatically on PyPI when you create a new release, but only if the QA steps have passed.
There are plenty of CI/CD tools (Travis-ci, CircleCI, Azure Pipelines, …) but I like having my code and my CI/CD pipelines in one place so I started using Github Actions.
To create a pipeline, you will only need to add a YAML file in a .github/workflows. Here is tsgen’s .github/workflows/pipeline.yml:
| name: CI/CD # pipeline's name that will appear in Github Actions | |
| on: # events that trigger our pipeline: push on any branch and release creation | |
| push: | |
| release: | |
| types: [created] | |
| jobs: # jobs. We will have two jobs (test and publish) with multiple steps. | |
| test: | |
| # Our test job will run on ubuntu. | |
| # We define matrix strategy for python-version so that | |
| # our tests are run on multiple python versions: | |
| runs-on: ubuntu-latest | |
| strategy: | |
| matrix: | |
| python-version: [3.6, 3.7, 3.8] | |
| steps: | |
| - uses: actions/checkout@v2 | |
| - uses: actions/setup-python@v2 | |
| with: | |
| python-version: ${{ matrix.python-version }} | |
| - name: Run image # install poetry | |
| uses: abatilo/actions-poetry@v2.0.0 | |
| with: | |
| poetry-version: 1.0.10 | |
| - name: Install dependencies # install all dependencies | |
| run: poetry install | |
| - name: Pylint # Run pylint static analysis | |
| run: | | |
| poetry run pylint tsgen | |
| - name: mypy # Run mypy static analysis | |
| run: | | |
| poetry run mypy -p tsgen | |
| - name: Pytest # Run pytest | |
| run: | | |
| poetry run coverage run -m --source=tsgen pytest tests | |
| poetry run coverage report | |
| - name: Coveralls # Send coverage metrics to coveralls.io | |
| run: poetry run coveralls | |
| env: | |
| COVERALLS_REPO_TOKEN: ${{ secrets.COVERALLS_REPO_TOKEN }} | |
| publish: | |
| # Our publish job will only run on release creation events, | |
| # and only if the test job has passed | |
| if: github.event_name == 'release' && github.event.action == 'created' | |
| needs: test | |
| runs-on: ubuntu-latest | |
| steps: | |
| - uses: actions/checkout@v2 | |
| - uses: actions/setup-python@v2 | |
| with: | |
| python-version: "3.8" | |
| - name: Run image | |
| uses: abatilo/actions-poetry@v2.0.0 | |
| with: | |
| poetry-version: 1.0.10 | |
| - name: Build and publish # publish tsgen to PyPI | |
| env: | |
| PYPI_USERNAME: ${{ secrets.PYPI_USERNAME }} | |
| PYPI_PASSWORD: ${{ secrets.PYPI_PASSWORD }} | |
| run: poetry publish -u $PYPI_USERNAME -p $PYPI_PASSWORD --build |
I think the syntax is fairly easy to understand. You define jobs that can depend on each other, and each job is a combination of standard (actions/setup-python@v2) or custom (run commands) steps.
You can define environment variables to use in each step, which will often use GitHub secrets to pass sensitive information such as passwords or tokens.
If you pay attention, you will notice that I added a step at the end of the test job to send coverage data to coverall.io, which allows you to keep track of your test coverage.
Documentation
I think it is now safe to say that we have put in place many things to ensure continuous integration and delivery of a quality PyPI package. However, something crucial is missing if we want to create adoption for tsgen. And that’s documentation.
How can a new user know how to use tsgen? Which functions are defined, and which parameters are expected?
Documentation generation with Sphinx
From Sphinx documentation:
Sphinx is a tool that makes it easy to create intelligent and beautiful documentation.
And that’s just what we want to do!
To initialize your sphinx doc:
poetry add -D sphinx
mkdir docs
cd docs
poetry run sphinx-quickstart
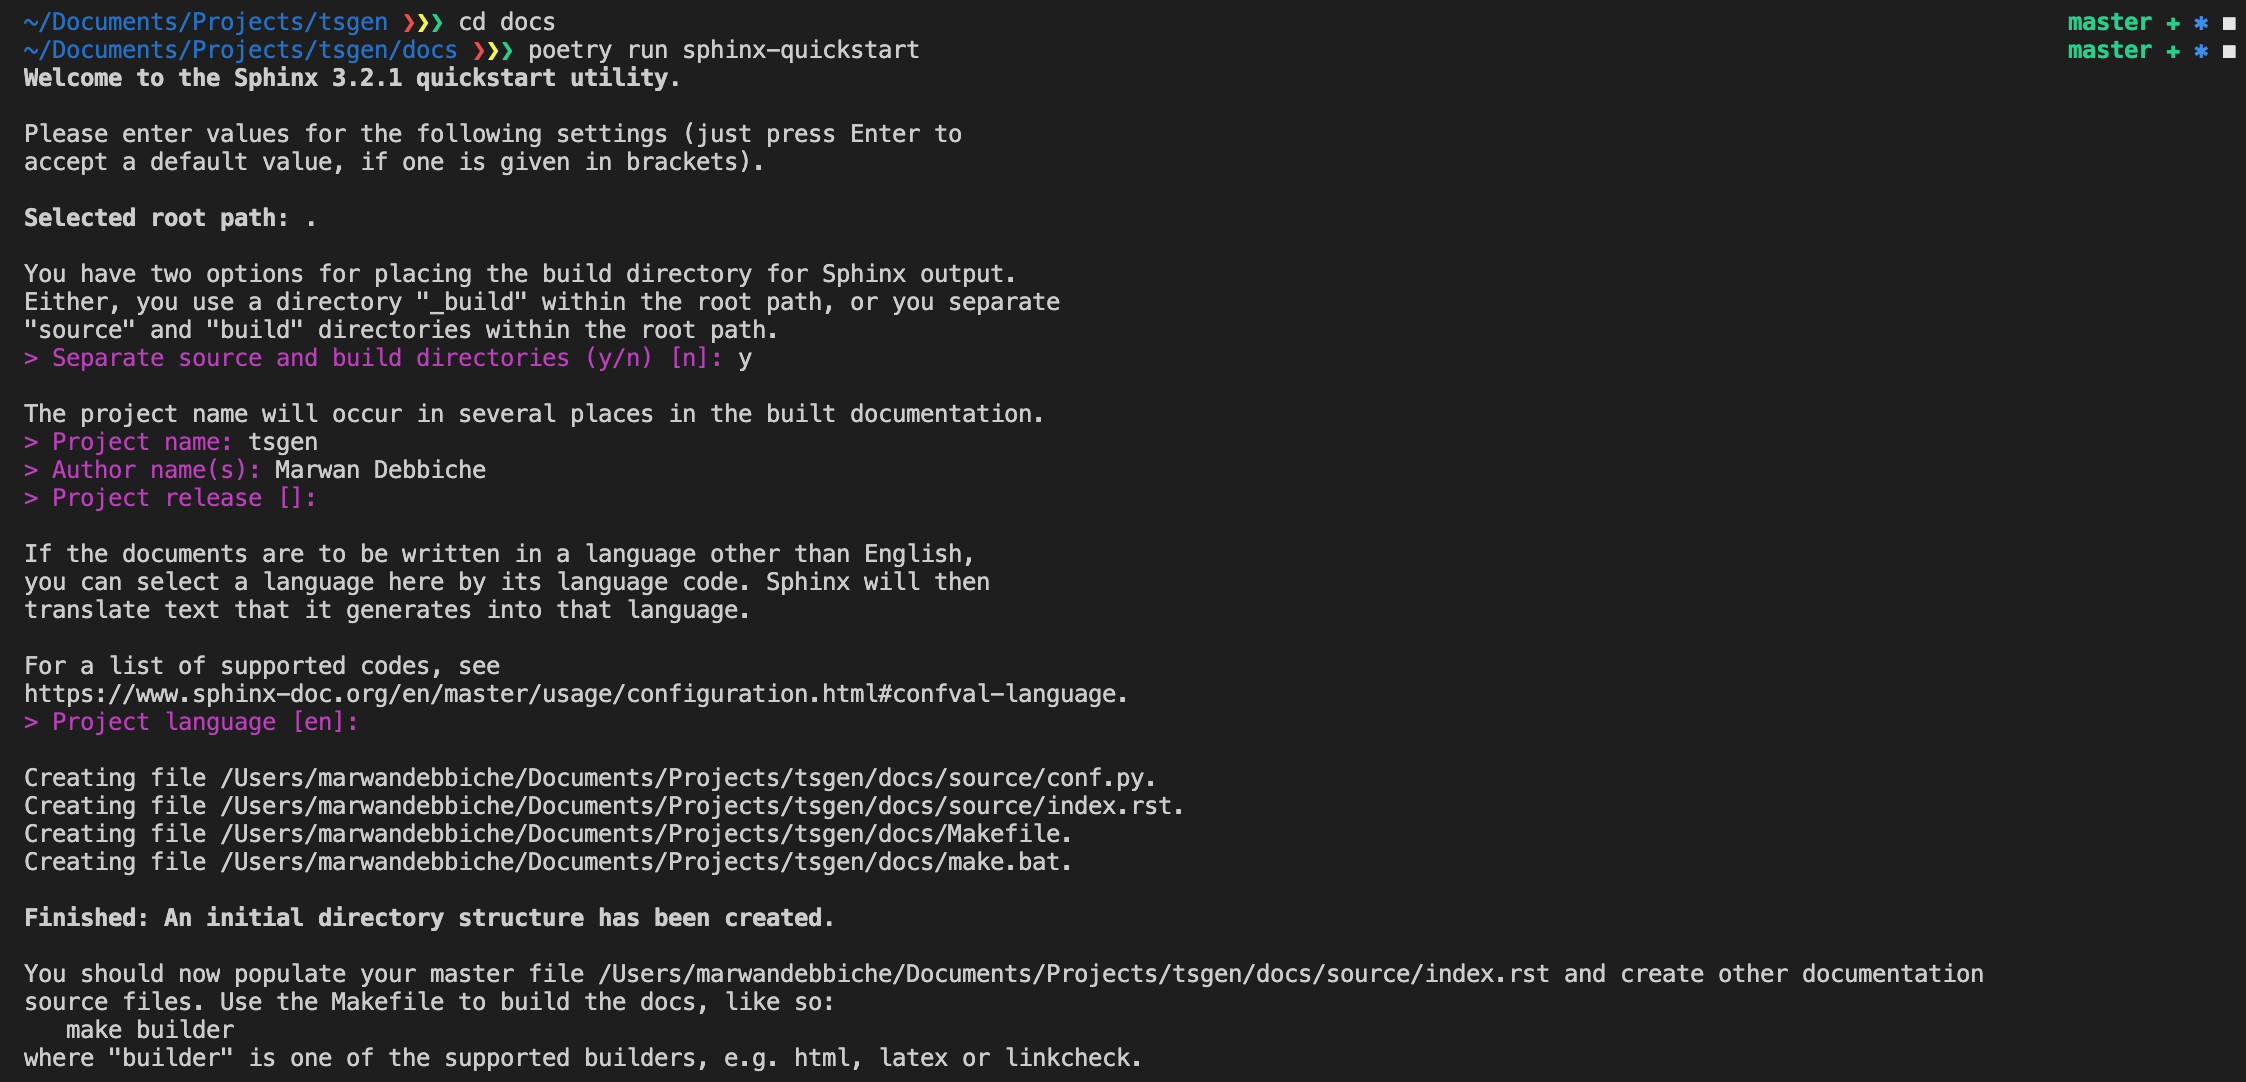
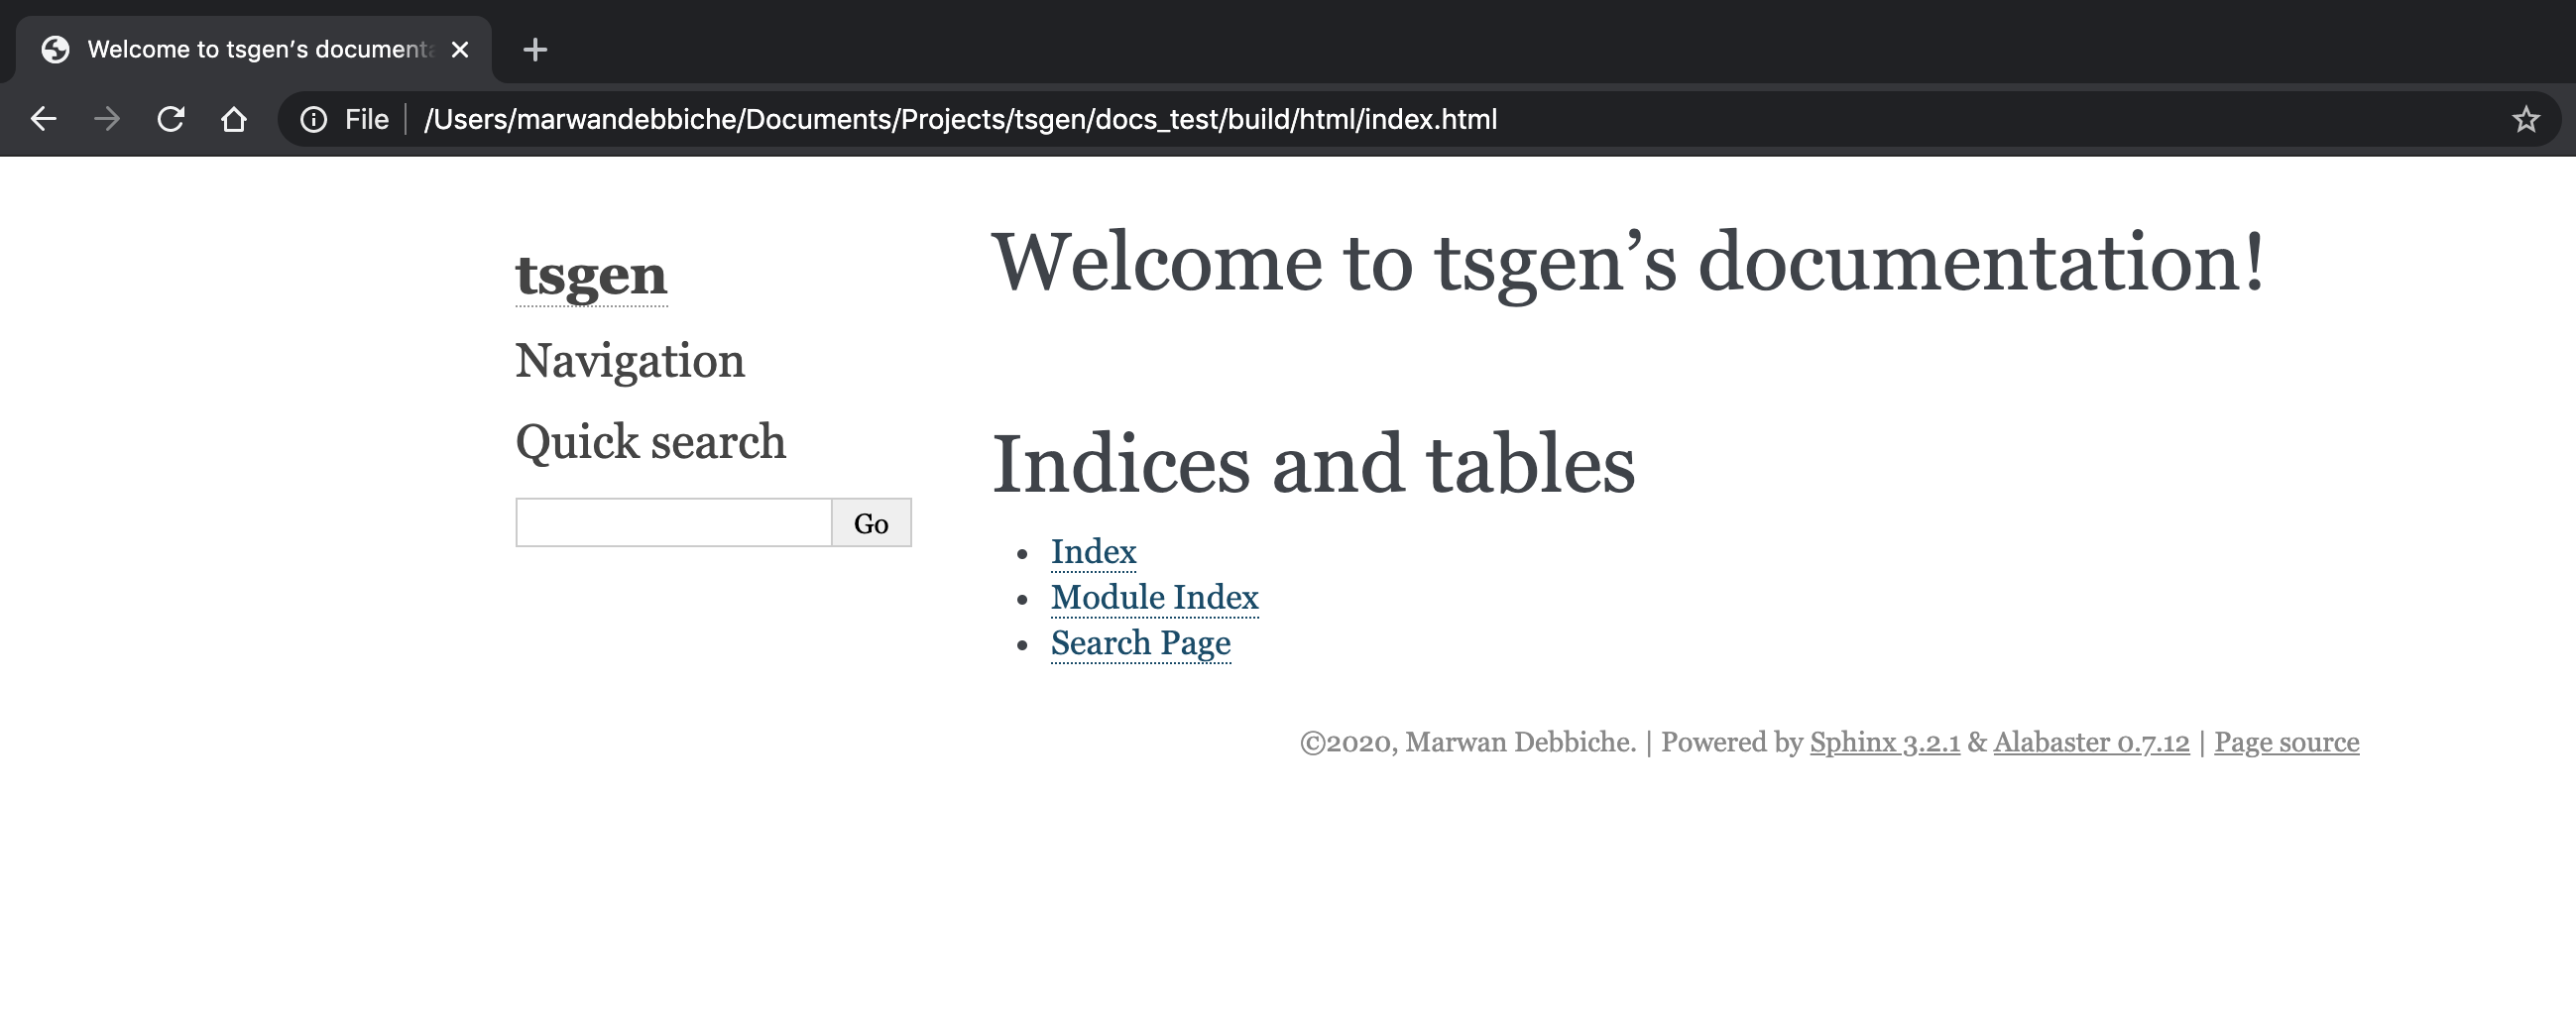
Sphinx will create all the directories you need to start your documentation. You can build your documentation with:
poetry run make htmlAnd you can now open the built index.html in your browser:
To actually provide some information you should:
- Write a few general things about your package in the
index.rstfile, like what it does and how you can install it, and maybe some simple “Getting Started” explanations. - Create an API reference page that will automatically import information about your package’s modules, classes, and functions from docstrings using the autodoc extension.
- You can also create a Tutorial page.
Sphinx is highly customizable, so you can easily change the theme of your version (I personally like Read the Docs theme).
I won’t go into detail here, you can always have a look at the docs folder of tsgen’s GitHub repository. But the final result will look like this:
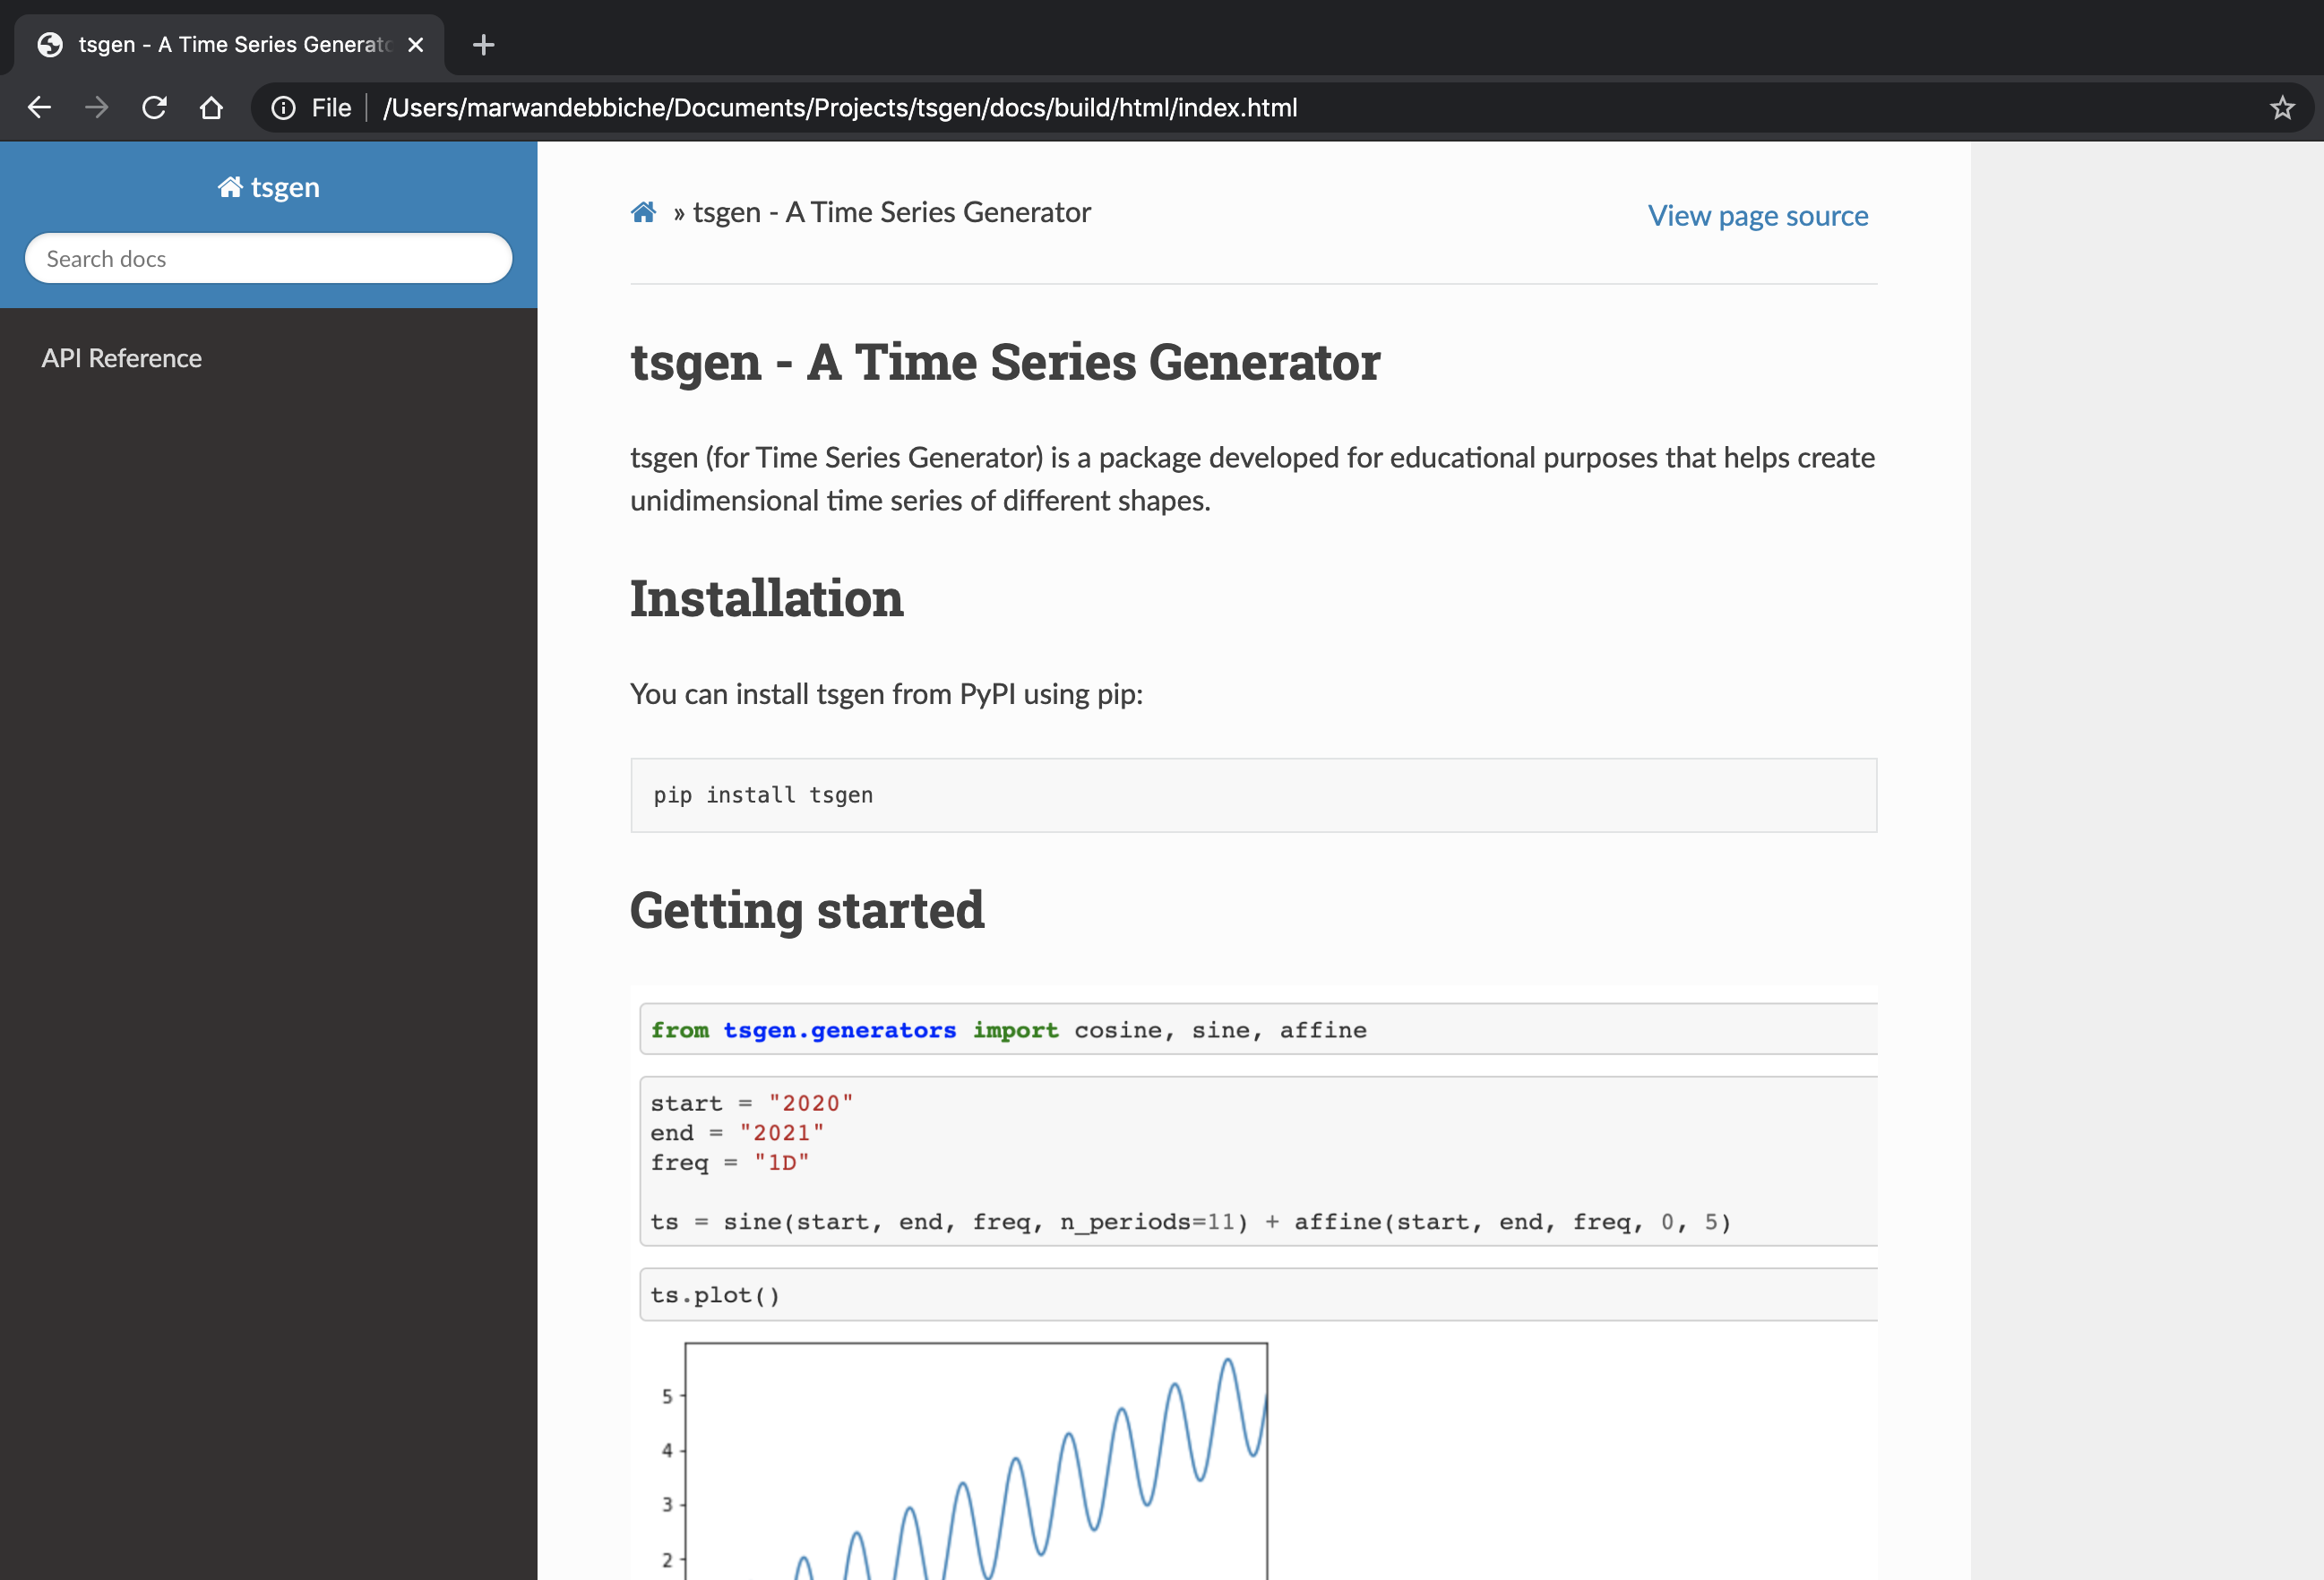
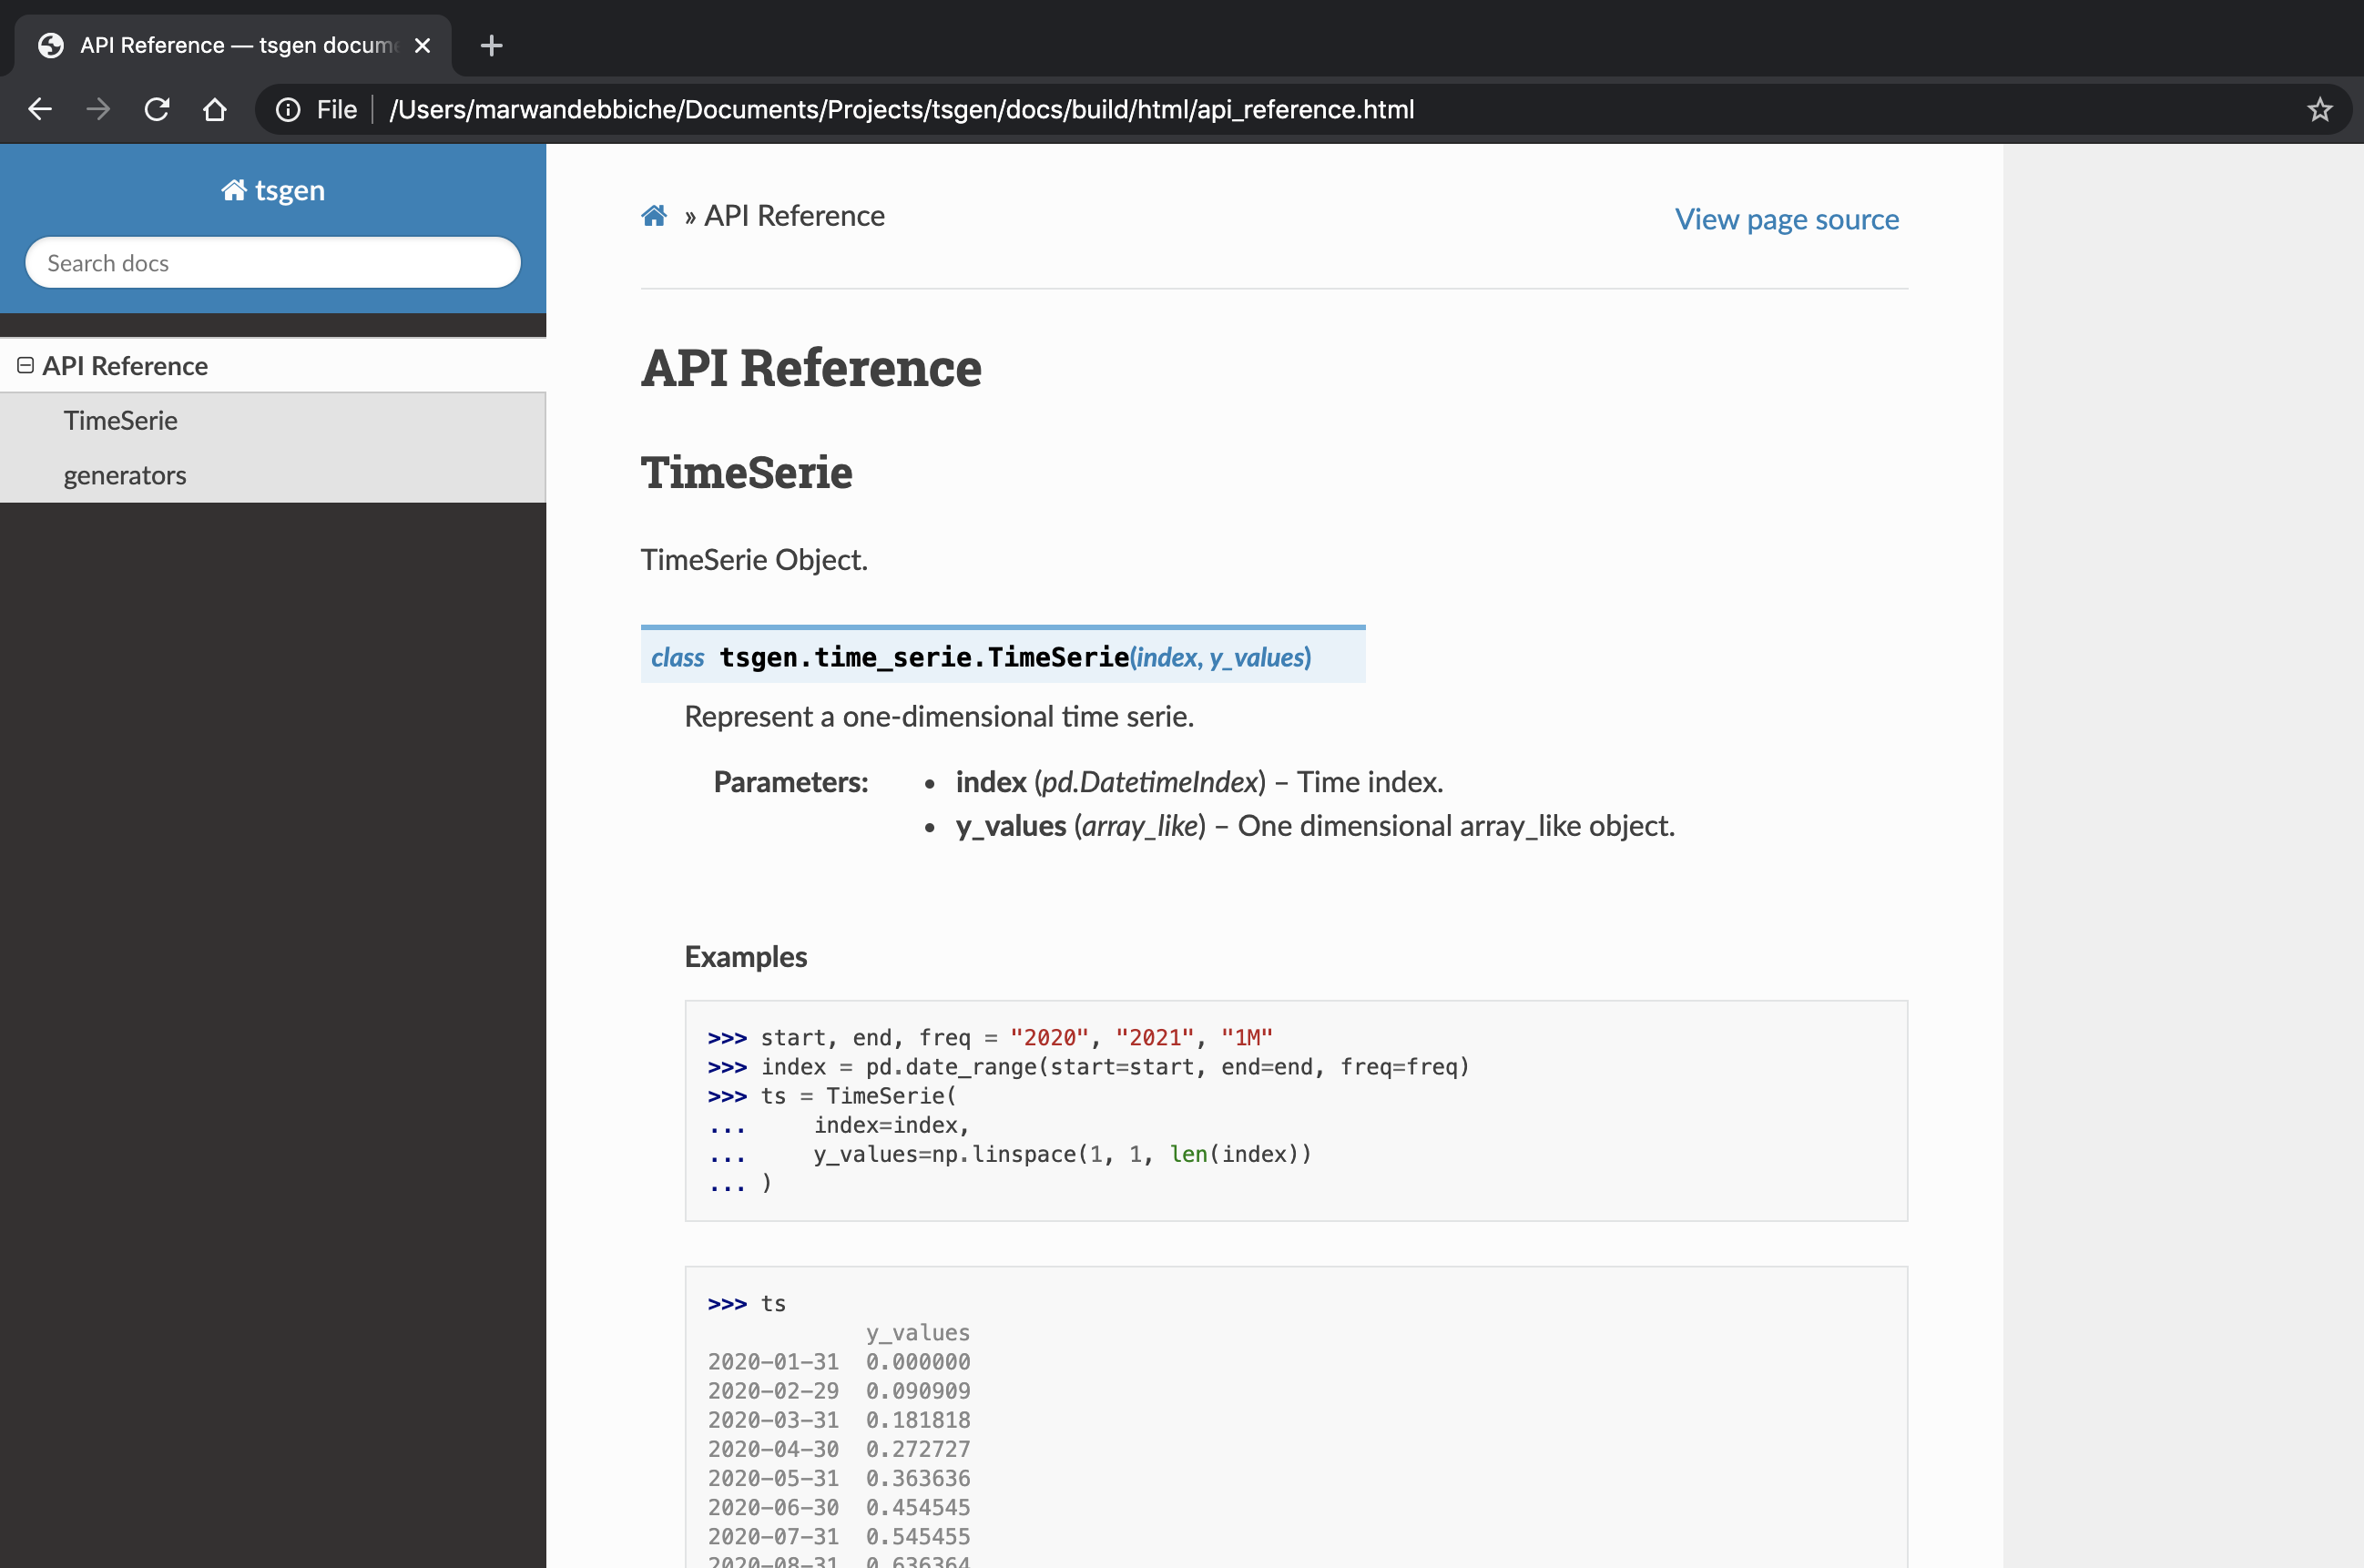
Pretty neat, right?
Documentation hosting with Read the Docs
Now that we are satisfied with our documentation, we will need to host it somewhere on the internet so that new users can view it.
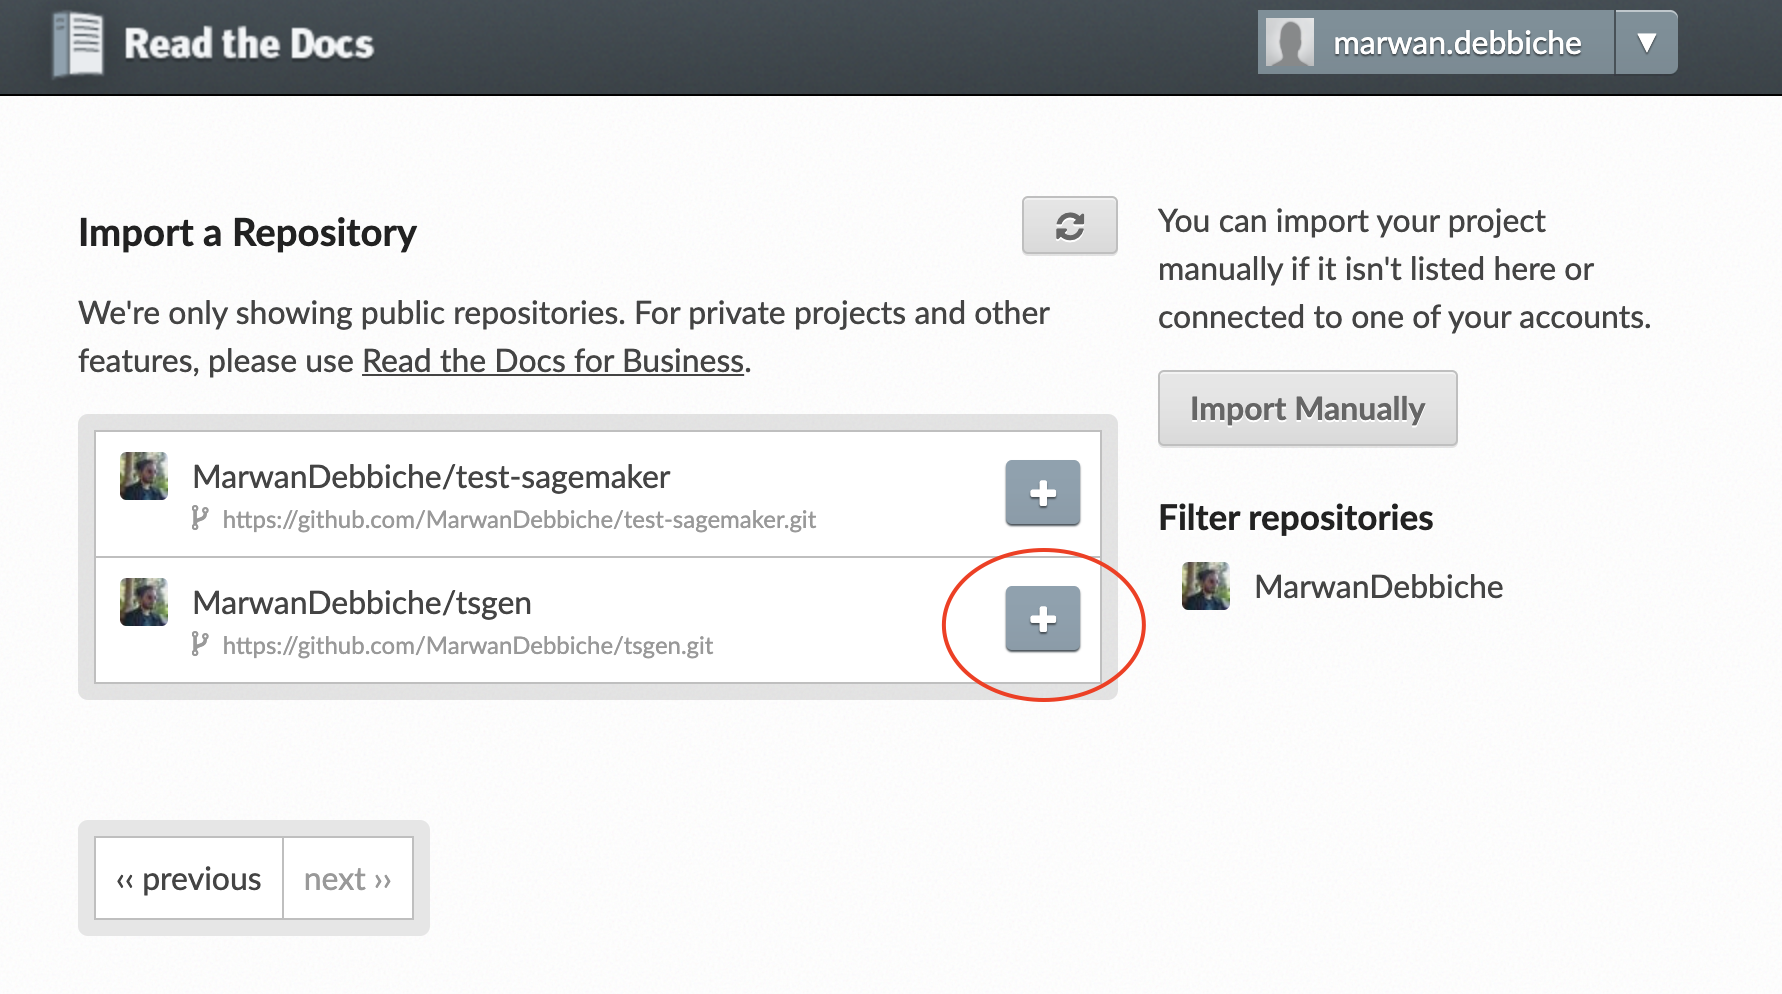
Read the Docs automates the process of building and hosting of your documentation. Once you have created an account, you will need to create a .readthedocs.yml and import your git repository:
| # Read the Docs configuration file | |
| # See https://docs.readthedocs.io/en/stable/config-file/v2.html for details | |
| # Required | |
| version: 2 | |
| # Build documentation in the docs/ directory with Sphinx | |
| sphinx: | |
| configuration: docs/source/conf.py | |
| python: | |
| version: 3.8 | |
| install: | |
| - method: pip # install tsgen. You will need this for autodoc to work | |
| path: . |
Once it’s done, every time you push to master or create a new release, Read the Docs will automatically build and host your “latest” or “stable” documentation.
You can have a look at tsgen documentation on Read the Docs.
Conclusion
What I learned developing pylambdarest as well as tsgen is that in the beginning, you will spend a lot more time setting up all your development tools than actually coding. But it’s totally worth it. Once you are all set, you can focus on developing new features for your package, instead of spending time finding or fixing bugs, or deploying your package.
Enforcing style conventions with linters will also improve your code readability and by doing so, you will increase your team’s velocity.
Also, keep in mind that the particular tools I presented often have many viable alternatives. Choose the ones that work best for you and your team. But make sure you do choose some, or you won’t be able to ensure high quality for your software and development process.
Links
- tsgen GitHub repository
- tsgen documentation
- tsgen on PyPI
- Have a look at pylambdarest!